Ryan's Recipes Food from all around the world -- recipes, gardening, cooking, grilling, and more.

Ryan’s Salsa Recipe

Posted in:

Ryan’s Tomato Salsa Recipe

Tomato Salsa

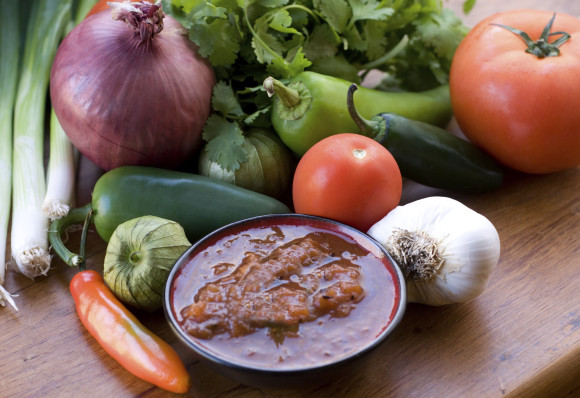
There are so many variations of salsa, it’s difficult for me to pinpoint just one recipe. So, I will start out with a salsa I make most of the time for those who come over and eat.  This recipe can be mild or hot, depending on how many peppers you wish to add.  I also use this salsa as a base for other salsas that I make.

There are a couple things to remember when preparing salsa: use good tortilla chips and know the amount of salt in those chips. I would recommend buying tortilla chips at the Mexican markets like Rancho Markets. They make their chips from scratch. Also, be mindful about how much salt is used on the chips. You will have to compensate in the salsa.

Ingredients for salsa:

1 8oz can of tomatoes diced (use a good can of tomatoes like Hunt’s. Make sure it is not stewed in herbs. No need to use expensive cans like Cento. Feeling adventurous? Use 4 roma tomatoes instead)
1 Jalapeno sliced with the seeds removed (use 2 if you like it hot)
1/2 small or medium onion sliced
1-2 garlic cloves
1 bunch of cilantro, equally very roughly a 1/2 cup
1/4 teaspoon of salt
1/2 teaspoon of cumin
1 teaspoon of light olive oil (or canola oil)
1 teaspoon of chile powder (make sure you do not use chili powder that’s blended with other spices)
1/2 lime squeezed or 1 teaspoon of white vinegar
1 Poblano pepper, sliced and seeded
1 Chipotle pepper from a can (skip this if you want a milder salsa or use just use some of the juice in the can)
1/4 cup of water (add more as desired)
Salt and Pepper to taste

If you are able, grill the Jalapeno pepper, Poblano pepper, garlic, and onion until charred on the outside. Not to worry if you cannot grill these. The Chipotle pepper or juice will add an additional smoky taste to the recipe.  But grilling the additional ingredients adds a wonderful flavor.

After grilling (skip to next step if you didn’t grill), cut off the stems of the peppers and slice the peppers to remove the seeds.

Add all ingredients in a blender except for water. Turn on blender for about 15-20 seconds. Check the consistency of the salsa and add water as needed. You do not want the salsa to be too thick or too thin. A good way to test is to dip a chip in the salsa and eat.  This is also a good time to check the saltiness of the salsa.  Add more salt if desired.  If you add more water, continue to blend for a few seconds.

Pour into a bowl or similar and serve with chips or on top of your favorite meats.
 

Greek Tzatziki Sauce Recipe

Posted in:

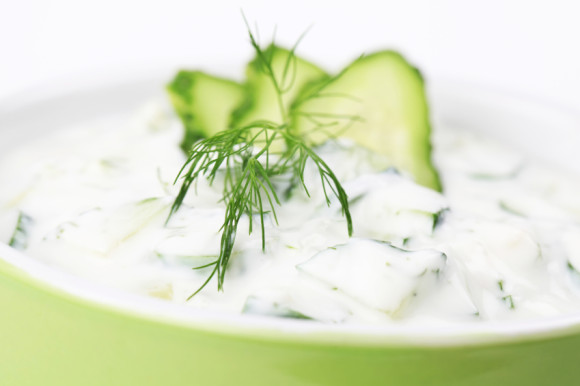
Ryan’s  Greek Tzatziki Sauce Recipe (Cucumber Sauce)

Greek yogurt sauce with cucumbers, dill and garlic, known as tarator or snezhanka in Bulgaria or zaziki in Turkey. Shallow DOF

This wonderful Greek cucumber sauce is a versatile topping that can be used in appetizers, salads, main dishes, and more. Traditionally, it is used in Greek Gyro sandwiches, as a topping similar to what you would do with mayonnaise in an American sandwich. It’s wonderful on top of beef, chicken, or lamb kebabs, on top of greek rice, on top of salads and also sandwiches.

This sauce is easy to make, very, very delicious, and will stay in the refrigerator for about a week.

Ingredients for sauce:

1 cup plain yogurt (make sure it’s plain and not vanilla. Greek yogurt is fine but I like plain better)
3/4 cup sour cream
1 medium cucumber finally chopped (remove seeds and skin if desired)
1 tablespoon of white vinegar
1/4 teaspoon of dill (optional and/or you can also serve with fresh dill on top)
1/4 teaspoon of mint (also optional)
1 small onion or 1/2 large onion finally chopped
1 teaspoon of lemon juice
1/4 teaspoon of lemon zest
1 garlic clove finally chopped or pressed
1/4 teaspoon of oregano
1/3 cup of crumpled feta cheese
Salt and Pepper to taste

Add all ingredients in a glass bowl or similar. Still contents until smooth. Add salt and pepper to taste.

Cover and chill for 20 minutes or longer. Serve on top of your favorite dish.

Vietnamese Beef Pho Noodle Soup

Posted in:

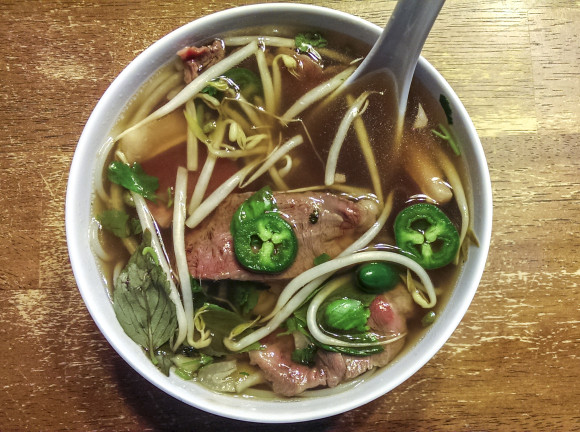
Ryan’s  Vietnamese Pho Soup Simplified

The biggest problem I have found when preparing Pho soup is the lengthy time it takes to make the perfect broth. Traditionally, Pho broth can take up to 10 hours to simmer. To me, that’s a lot of time smelling the aroma of the soup throughout the house and not eating it. I really do not have much patience when the house smells like good food all day. It reminds me of starving all day before Thanksgiving dinner.

The other difficulty with traditional Pho recipes is that it requires some ingredients that are not easily available at local markets or are expensive. Using chuck roast or beef leg bones can be expensive and somewhat of a waste. I am including alternatives in this recipe I have found to work just as well.

Ingredients for broth:

1 lbs of ground beef chuck (or chuck roast if you have one around)
2 medium onions sliced into quarters or chunks
1 four inch piece of ginger sliced thin or diced
14 cups of low sodium beef broth (the best way to make this is to use this beef bouillon)
4 Tbs fish sauce
1/2 of a cinnamon stick
5 whole cloves
5 star anise pods
2 teaspoons black peppercorns
1 tsp sugar

Ingredients for noodles:
16 oz Pho noodles or rice noodles

Ingredients for garnishes (you can pick and choose a lot of these):
3/4 lb rib eye steak (you can use any steak really) very thinly sliced and lightly salted
1/4 cup fresh cilantro
1 quarter onion sliced thinly
1 jalapeno sliced (optional)
Fresh basil
Bean sprouts
Lime wedges
Siracha sauce (optional)
Hoisin sauce (optional but good)
Fresh mint leaves (optional)
Salt

In a large pot, add the ground meat and break up. (I use ground beef because it has a greater surface area and will flavor the meat faster). Fill the pot with water until the beef is covered. Put on stove and bring to a boil. When the pot has reached a boil, continue to boil for a few minutes. Drain the meat in a colander and rinse the meat well. The trick here is to get the beef to be as clean as possible to produce a clear broth. If you are using a chuck roast instead, you can skip this first part and go to the next step. For the chuck roast, cut up the pieces small.

Add ground beef back to the pot. Add the onion quarters. If you have access to a grill or gas stove, char the onions for a bit. It adds a nice flavor (this is optional). Also add ginger, broth, fish sauce, cinnamon stick, cloves, anise, pepper and sugar to the pot. Simmer broth for 50 minutes (about 1.5 hours if you are using beef chuck instead of ground beef).

Using a separate large bowl or pot, drain broth with a colander into bowl. Discard solids; we are going to use the broth.

Next we need to work on getting the broth nice and clear. If you are using chuck roast, skip this step. If you have cheesecloth (folded a few times), that will do nice. If you don’t, you can use paper towels. Add cheesecloth or paper towels to colander, and pour broth back into pot. Repeat this process a couple times until you can see through the broth.

Put the broth back into the pot and keep warm on a low setting.

Broth is now done! Yum :)

Grab the rib eye steak, or whatever steak you want to use, and very thinly slice them into around 2″ shapes. The slices need to be thin enough for the broth to cook them. I would aim for about 1/16″ if you can or less than 1/8″. If you do not have a very sharp knife to cut the steak, put the steak in the freezer for a while to harden.

To prepare the noodles, you can simply follow the instructions on the package. Pho noodles are similar to cooking fettuccine noodles. Be careful not to boil the noodles too long so they are mushy. You want them to be al-dente like a good fettuccine because the hot broth will cook them longer.

Drain noodles and rinse them with room temperature water to remove excess starch. Add a tiny bit of vegetable oil if they are extremely sticky.

Next, prepare your bowls by adding some of the noodles and sliced steak. Lay the steak flat to ensure the broth covers it completely.

Yes, I do realize the steak is raw. The boiling broth will cook the steak. If this freaks you out, you can add the steak to the pot of boiling broth before you add them to the bowl. The point is, however, to eat the steak immediately after it’s cooked.

Now, turn up the burner that the broth was on from low to high. When broth begins to boil, immediately pour into the individual bowls of noodles and sliced meat. Make sure the meat is covered. If they float a bit, you can push them down with a spoon. You will notice they start cooking and turning color once you push them down.

Now you can add your garnishes. I like to add some bean sprouts, thin onion slices, 1-2 jalapeno slices which go very far, 2-3 basil leaves, a squeeze of lime juice, some salt if needed, 1/2 teaspoon of hoisin sauce, and 1 mint leaf.

Then eat!

Dill Pickles Recipe

Posted in:

Pickles! Pickles!

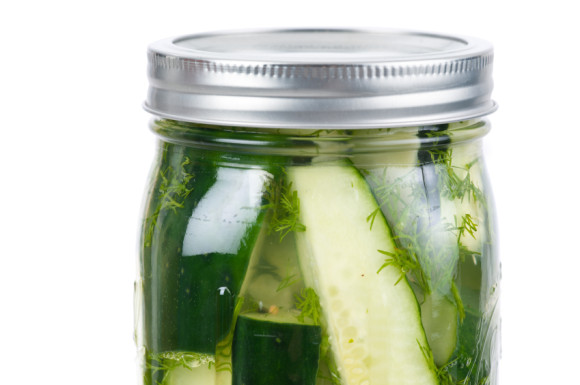
Ryan's Dill Pickles

Now you don’t have to buy pickles at the store again, because this recipe is easy and quick!  You should be done in about 10 minutes.

It does take a few days for the pickles to infuse and be ready to eat, but the preparation is a piece of cake.

The recipe I made below is prepared for savory, crunchy pickles to be ready-to-eat at the quickest time possible.  So, the pickles can be quite strong after a couple weeks in the fridge.  But they are perfect after 3 days. If you wish not to have such strong pickles, dilute the ingredients with more water (see at the bottom).  This also is better to do if you wish the pickles to be stored for a longer period of time.  As for everyone in my house, however, the pickles usually do not last more than a few days :)

  • 1.5-2 cups apple cider or white vinegar
  • 2 cups water
  • 1 tablespoons coriander seeds
  • 1 tablespoons mustard seeds
  • 2 teaspoons salt
  • 1-2 teaspoons fennel seeds
  • 4-6 whole cloves of garlic (crush them if you want a garlic pickle)
  • 2 teaspoons of dry dill or 2 tablespoons fresh dill
  • 2 bay leaves (ensure there is 1 bay leaf for each Mason jar)
  • 2 teaspoons of dry mustard (use more if you do not use mustard seeds)
  • 2 teaspoons sugar
  • 4 medium cucumbers cut in half then sliced length-wise

Add sliced cucumbers, garlic, and bay leaves to 2 Mason jars. Add all other ingredients to a small saucepan over high heat. Cook until it begins to boil and salt/sugar dissolves. Pour carefully the hot liquid equally into the 2 Mason jars.  Seal, and allow to cool to room temperature.  Refrigerate for 2-3 days before serving.  Then eat!

As you might already notice, this recipe is quite flexible. You can use carrots or cauliflower instead of cucumbers. You can add jalapenos or chilies if you want it spicy. You can also add other ingredients to make it international (ie. cumin for Indian flavor; or rice wine vinegar, sugar, and no dill for Asian).

If you wish to make cucumbers for long-term storage, change recipe to 1 cup vinegar and 2 1/2 cups water.  Refrigerate for 1 week prior to serving.

Saag Shorba (Indian Soup)

Posted in:

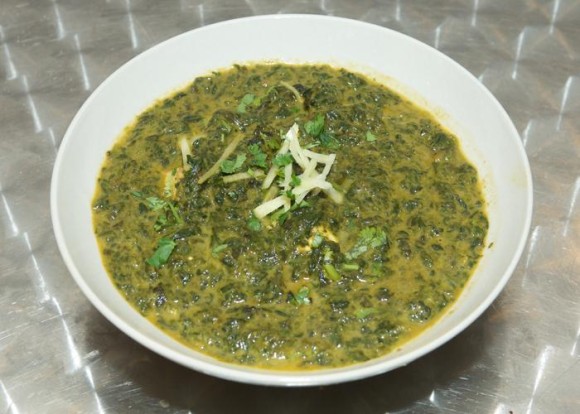
Ryan’s Saag Shorba

 Saag Shorba

This is definitely my favorite soup of all time!  It has a heartiness to it that fills you up, and an amazing flavor.  I stock my freezer with leftovers of this to defrost and warm up  on days when I want something wonderful, but don’t want to cook.  The amazing thing about this soup and many Indian dishes in general, is that they taste better the next day or keep the flavor even after 6 months in the freezer.

Ingredients:

12 oz spinach, fresh or frozen is fine
2 medium onions finely chopped
5 cloves of garlic
2 tbs of ghee (or vegetable oil)
3 inch piece of ginger chopped
2 teaspoons of coriander
2 teaspoons of ground cumin (or more if you like)
1 teaspoon of turmeric
Scant cayenne
Scant cardamom
5 cups of chicken broth
4 cups of tomatoes diced (or 32 oz canned diced or crushed)
1 tbs of tomato paste
2 cups of heavy cream
Salt to taste

In a large saucepan or pot, heat the ghee or oil on medium.  Add chopped onions. Saute for 5-10 minutes.  Add garlic, ginger, coriander, cumin, turmeric, cayenne, and cardamom.  Saute for 3 minutes more.

Add broth and bring to a boil.  Add spinach and tomatoes and bring back to a quick boil.

Turn off heat and transfer to a blender and blend until a thick consistency, just a few seconds. The spinach has to be broken up so there isn’t long strands (see photo above).  Try not to make it into a puree.

Add back to pot and add cream, slowly to avoid curdling.

Add salt to taste and more cayenne and cumin if you wish.

Simmer for 10-20 minutes if you wish to enhance the flavor of the spices.

Serve with cilantro as garnish.

If you would like to have this soup as a main course with more substance, you can add chicken to the pot after you add the spices. It’s probably best if the chicken is cut into pieces. Make sure to remove the chicken prior to blending the soup. Afterward, add the chicken back to the pot along with the blended soup.

Fennel Fronds

Posted in:

Our fennel herb plants are sooo out of control; I need people to come over and pick some! Please! Free fennel fronds!

I use the stalks as a replacement in any recipe that asks for celery.

After the flowers are done blooming, they turn into fennel seeds.  Fennel seeds are awesome in Indian dishes and pickling.

The fronds are good in the Toscana Soup. Fennel can go on top of any Italian dish and in it as an ingredient: spaghetti, pizza, it also can go in Indian dishes too…also if you are pickling or doing any dressing that is vinegary, it works wonders.

Ryan’s Zuppa Toscana Soup

Posted in:

zuppa toscana soup
Zuppa Toscana Soup

Zuppa Toscana Soup

Ingredients

1 lb of Italian or Greek sausage (use hot or mild depending on your taste)
4-6 slices of pancetta or bacon cut into 1/4 inch bits
1 white or yellow onion diced
3 large potatoes largely diced
1 sprig fresh tarragon roughly chopped (optional)
1/2 cup cherry tomatoes sliced in half (optional)
3 cloves of minced garlic
1.5 cups of heavy cream
8 cups of chicken broth
1 cup of kale or fresh spinach
1/4 cup grated Parmesan cheese
Directions

  1. Heat heavy pot or dutch oven (link is to my favorite low-cost dutch oven) over stove to medium-high heat. Cook sausage until browned. Set aside.
  2. Cook pancetta or bacon in the pot until crisp. Drain bacon fat leaving a few teaspoons or tablespoons.
  3. Stir in garlic and onions. Cook about 5 minutes until onions are soft and translucent. Be careful not to let the garlic burn.
  4. Pour chicken broth in pot that already has the onions and garlic. Set to high and bring to boil.
  5. Add potatoes and tarragon and continue to boil until they are fork tender, about 10-15 minutes.
  6. Reduce heat and stir in the sausage, heavy cream, tomatoes, and kale. Stir until evenly distributed and sausage is heated through.
  7. Add to bowls and sprinkle with Parmesan


Cutting Calories?

If you wanted to make this dish lighter, buy extra lean sausage and turkey bacon or similar.  Substitute potatoes with eggplant.  Reduce the amount of heavy cream and increase the amount of chicken broth.  Or, do what I do: reduce your portion! Would you prefer a longer so-so experience, or a shorter AMAZING experience? :)


Ryan’s Chile Verde Recipe

Posted in:

Ryan’s Chile Verde

Chile Verde
Chile Verde

Ingredients:

1-2 lbs tomatillos
5 garlic cloves (not chopped)
1-2 jalapenos (seeded, and/or just depending on how hot you want it)
2 Anaheim or poblano chiles (optional, but it adds flavor and creates a larger amount of chile verde)
1 bunch cilantro leaves
2-4 pounds pork roast cut into 1 to 2-inch cubes (pork loin, pork shoulder, etc)
1-2 tbs olive oil
1-2 yellow onions (sounds like a lot, but it enhances the flavor and you do not taste the onions much)
3 garlic cloves chopped or grated
1 Tbs oregano
2 1/2 cups chicken broth (I use water with Better than Bouillion chicken base – stuff is awsome)
Small pinch of ground cloves (optional)
Salt & pepper
2 tsp cumin
1-2 bay leaves

Preparation:

  1. Remove husks from tomatillos and rinse. Grill on the grill (that’s what I do) or put in oven along with 5 unpeeled garlic cloves, on a foil-lined baking sheet. Place under a broiler for about 5-7 minutes.
  2. Place tomatillos into blender. Remove the roasted garlic cloves from their skins, add them to the blender. Add chopped Jalapeño peppers, other chilies (if you are using them), and cilantro to the blender. Pulse until all ingredients are finely chopped and mixed.
  3. Season the pork cubes with salt and pepper. Heat olive oil in a large pot over medium high heat and brown pork chunks well on all sides. Lift pork out of pan and place in bowl, set aside. You can skip this step if you are short on time.
  4. Place the onions and garlic in the same skillet and cook about 5 minutes. Add pork back to the pot. Add the oregano and tomatillo chile verde sauce, chicken stock, and a pinch of cloves to the pork and onions. Add a little salt and pepper. (Not too much as the chile verde will continue to cook down and concentrate a bit.)
  5. Bring to a boil and reduce to a slight simmer. Cook for 2-3 hours uncovered or until the pork is fork tender. I use a pressure cooker and it takes 45 minutes.

Adjust the seasoning to taste with salt and pepper. Serve with rice and tortillas.